GIG reference manual
the animation menu
______________________________________________________________________________________________________________________


Section contents
Introduction
In GIG, the following parameters can be animated:
- solids:
- position (x, y and z)
- rotation (x, y and z)
- size (x, y and z)
- skew (xy, xz, yx, yz, zx, zy)
- textures
- light sources
- position (x, y and z)
- colors (r, g and b)
- intensity
- spot angle
- spot direction (x, y and z)
- spot focus
- animation camera
- position (x, y and z)
- zoom
- pan
- roll
- tilt
- COI (Center Of Interest) position (x, y and z)
- Free Forms
- position of control points (x, y and z position of each
animated control point)
For information on Flowmotion, Nurbs, Particles, and Organic, refer to the tools menu.
The animation of parameters is controlled by time curves. A time curve is a smooth curve that runs through control points, which define the value of a parameter (e.g., position of an object) for a certain frame.
A time curve can be created in the following ways:
- By fixing parameter values for certain frames using fix event.
- By creating a new track and connecting it to the position of an object (solid, light source or camera, can not be used for parameters other than the x, y and z position).
1. fix event
By fixing parameter settings for certain frame numbers, control points will be created. To interpolate the parameter values between the fixed events, a time curve running through the control points will automatically be created.
The fix event button can be found in the following menus:
- transform
- To animate position, rotation, size and skew of solids
- texture
- To animate texture parameters.
- lights
- To animate the position, spot angle, direction, focus, intensity and colors of (spot)lights
- camera
- To animate the position, zoom, pan, roll and tilt of the animation camera.
- ff trans
- To animate the position of the control points in free form shapes
Note: Time curves can be displayed and edited in the time curve submenu (animation menu).
The position parameters (x, y, and z position) of an animated object can be edited as a track in the edit track submenu.
2. new track
A track can be used only to animate the position of objects. It cannot be used for rotation, size, colors, etc.
A track has three time curves (x, y, and z position). A new track can be created in the main animation menu. The new track can then be connected to the position of a solid, a light source, the animation camera, or the COI (center of interest) of the animation camera.
Note:
Existing tracks can be edited in the edit track submenu.
Because a track is basically a set of three time curves (x, y, and z position), the time curves of the track can be edited like any other time curve in the time curve submenu.
primitive, object and super sequences
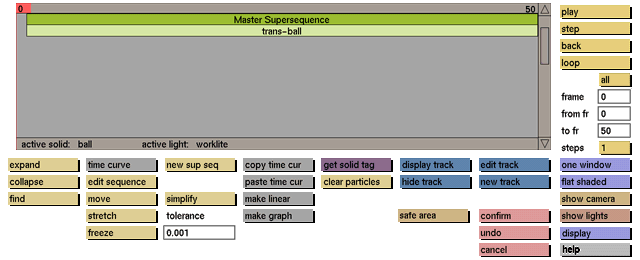
To organize animations, GIG will automatically create sequences to store all animation data. Sequences will be displayed in the large sequence selection box of the animation menu. Sequences can be:
- primiti ve sequence
- This is the lowest level and will contain a time curve only.
- Example: 'wheelLF-posx' .This primitive sequence will contain the time curve for the x position of tag: wheelLF-posx'.
- object sequence
- This level contains all primitive sequences for an animated object.
- Example: 'trans-wheelLF'. This object sequence will contain all primitive sequences for the tag: 'wheelLF.'
- super sequence
- This level can contain all or a number of object sequences. It can also contain other super sequences. By default there will only be one super sequence with the name: 'Master Super Sequence' (see below). All object sequences will be placed under this super sequence. To organize your animation data new super sequences can be created using new sup seq. object and other super sequences can then be moved to the new super sequence.
- Master Super Sequence
- This is the highest level and will contain all super and object sequences. By default all object sequences will be stored directly under the master super sequence unless another super sequence has been activated.
User interface
The animation menu uses two windows at the top of the screen. The right window shows the view of the animation camera (anicam) or one of the modeling views. To switch between these view options click the name of the required camera (cam 1, cam 2, cam 3 or anicam) in the ruler on top of this window. The left window presents the views obtained by the fixed cameras along the main axes. The cameras of the left window each supply a non-perspective view of the model and can be activated one at a time by clicking the word front, top or side in the ruler on top of this window.
The animation menu itself fills the bottom part of the screen.
Five submenus belong to the animation menu. Four of these can be displayed by clicking one of the following buttons:time curve, edit sequence (which refers to the supersequence, the object sequence and the primitive submenu) and edit track, and then selecting the supersequence, the object sequence, or the primitive sequence in the selection box of the submenu. Only primitive sequences have time curves. The fifth submenu, track points, can be displayed by clicking the corresponding button in the edit track submenu.
The main GIG menu is not present in the animation menu. To exit this menu click the confirm or cancel button at the lower right side of the menu.
The animation menu appears when you click the corresponding button from the main menu.
Note
To display a wire frame animation in real time, use the record flipbook option in the Organic or Particles camera control boxes (see tools menu).


